
- Best Outdoor Kegerator Options: Which is Right for You? - May 15, 2022
- Creative DIY Counterflow Wort Chiller Ideas - February 13, 2022
Beer is one of humanity’s oldest and most celebrated drinks. The ease of grains undergoing fermentation from the introduction of wild yeasts in the air caught the attention of humans as far back as 10,000 years ago.
Since then, many cultures around the world have been brewing up different styles and flavor profiles, advancing the types of beers to more than 100. With so many types of beer out there, it’s no surprise to see the popularity of homebrewing on the rise.
Homebrewing can be a fun way to get creative with different recipes, and a cheaper way to enjoy beer. But when first getting started with homebrewing, there is a lot of homebrewing equipment to purchase which can be expensive, particularly the wort chiller as it is one of the most important pieces.
New wort chillers can cost anywhere from $70-200 or more depending on the type of chiller. One way to cutback on this expense is by crafting your very own DIY wort chiller, either a DIY immersion wort chiller or a DIY counterflow wort chiller.
Bottom Line Up Front
Most home brewers agree that a wort chiller is one of the most critical parts of home brewing. You can purchase a counterflow wort chiller or you can make your own. It’s a worthwhile investment for the best brew.
What are Wort Chillers?

Wort chillers are so important to the brewing process for a few different reasons. After bringing the wort (the liquid left from the mashing process that will be fermented into alcohol) to a boil, it is crucial to bring the wort temperature down to 80 degrees or lower before the yeast can be introduced.
Because the fermentation process will create heat, pitching yeast at lower temperatures helps against large heat spikes and will maintain good flavor in the beer.
As pointed out on Morebeer.com, in brewing, it is often considered a rule of thumb to pitch 2 degrees lower than the recommended temperature provided for the particular type of beer and yeast strain.
For example, if the recipe calls for the wort to be 68 degrees for pitching the yeast, you should actually aim for 66 degrees before doing so. Pitching the yeast at lower temperatures can also keep the wort safe from bacterial infections and help to produce a clearer beer.
The counterflow wort chiller is particularly efficient at cooling the wort quickly. It is basically a copper tubing that is inside a larger tubing, or hose. Hot wort flows from the kettle through the copper tube, while cold water flows in the opposite direction through the larger, outside tube absorbing the heat.
Because the temperature differences are so extreme between the hot wort and the cold water, this method of cooling is considered quite effective. Counterflow chillers require a boil kettle with spigot, and much more diligent cleaning which some brewers do not prefer.
Immersion chillers are made from coiled copper tubing that gets fully submerged inside the boil kettle. Similar to counterflow chillers, wort is cooled by running cold water through the coils.
Unlike counterflow chillers, immersion chillers can be used in any brew kettle with or without a spigot and are easier to clean. The downside is that immersion chillers are not found to cool as fast as counterflow, particularly if brewing a larger batch of 10 or more gallons.
Why Use an Immersion Wort Chiller?
Immersion wort chillers are often what many homebrewers prefer for ease of cleaning and the ease of making one at home, DIY style, with a few basic supplies and tools.
Because it is one continuous coil, there are less nooks and crannies on an immersion chiller that need to be cleaned than a counterflow one. This means less chance for microbes and bacteria to creep in which can ultimately lead to a batch spoilage.
Also, because the immersion wort chiller is fully submitted into the wort in the boil kettle, there is more surface area contact. This can mean a more consistent chilling of all the wort simultaneously, rather than in portions as with the counterflow chiller. For some brewers, this is a preferred method of chilling the wort.
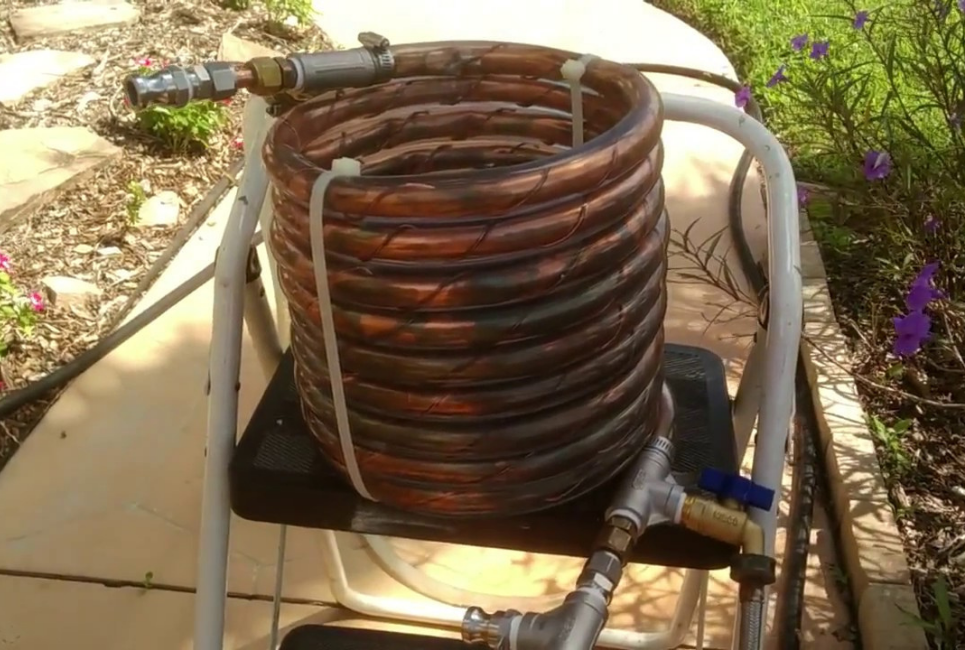
DIY Immersion Wort Chiller

Homebrewer John Wilmes has been brewing for almost 10 years. He has a four-tap keg system in his basement that he keeps regularly stocked and rotates with different styles of beer seasonally.
He put together a DIY immersion chiller that has been adequately chilling his wort for many years. He prefers the immersion chiller, “for its simplicity and ease of cleaning,” he said.
Supplies You Need for a 3-5 Gallon Kettle Batch:
- (2) 20’ rolls of 3/8” copper tubing OR (1) 50’ roll of 3/8” copper tubing. Two 20’ rolls could be soldered together and would be much cheaper than buying 1 50’ roll. However, you could use one 50’ roll and eliminate the need to solder together.
- ¼” copper coupling to solder the 2 rolls together if using 2 rolls of tubing. Not needed if using one continuous roll.
- 1 washing machine supply hose with ¾” garden hose thread to allow connection to outside faucet. One end cut off to allow sliding over the wort chiller inlet.
- 3/8” ID (inside diameter) x ½” OD (outside diameter) vinyl tubing for wort chiller outlet. Use enough length as needed to clear the boil kettle.
- 2 hose clamps, ¼” – 5/8” range. These are used to secure inlet and outlet hoses to wort chiller.
- Optional – Roll of thin copper wire to braid through wort chiller. This ensures a gap between each row of tubing to allow better heat transfer.
Directions:
- Before starting, keep in mind the height of your kettle and be sure to leave an appropriate amount of tubing unwound on either end for the water outlet and inlet.
- First take the copper tubing and wrap it around a paint tin or something of similar circumference and size. Be sure to leave 3’ minimum sticking out unwound. Later you will come back to this as it will become the water inlet.
- As you wind, aim to leave ½” between each wind. Copper is soft and fairly easy to work with but still be gentle and go slowly here for better accuracy with spacing.
- Continue winding until you have the necessary height for your kettle or roughly 2-3’ of tubing left. The remainder will be the water outlet.
- The next step is to bend the water inlet and outlets. If placing the coil on a work table or ground keep the water inlet and outlets end at the bottom. Gently bend the water outlet upward toward you, bending half of it outwards so it bends back down in a curved “L” shape at least 90 degrees. Repeat this for the water inlet tubing as well so it becomes flush with the coil.
- Now take the thin copper wire and do a fold and weaving pattern between each row of copper tubing, giving it a half twist in between each row to secure. Repeat on both sides of the coil. This creates structure and maintains a small gap between each row for better heat transfer.
- Leftover wiring can be used to secure the water inlet and outlet to each other and the coil.
- At the water outlet of the copper coil, slide a hose clamp over the end, then slide about 6’ of vinyl tubing over it by roughly half an inch. Glide the tube clamp back over the copper joint and tighten with a screwdriver.
- Attach the other hose clamp to the inlet end of the copper tube and secure tightly.
- Finally, test the wort chiller! This will provide two benefits; running boiling water through it will clear out any metallic or plastic flavorings, and you will notice any leaks, or problems with the coil before actually making beer and spoiling a batch.
Most homebrewers report completing their DIY immersion wort chillers in one to two hours. This could certainly be a fun project for the weekend and not overly time consuming. Another reason the immersion chiller is often preferred.
Why a Counterflow Wort Chiller?

Although immersion chillers and plate chillers are easy to clean, easy to make, and generally cheaper, some brewers claim the counterflow wort chiller can chill the wort twice as fast making it more consistent with cold break, or the clearing of the beer. It also keeps the boil kettle clear of coils and so easier for stirring the wort while chilling.
According to Homebrew Academy, counterflow wort chillers can be a little more work than the average at-home DIY project so be prepared to put in a little more time. Following the site’s recommendation, here is how to do a DIY counterflow wort chiller.
This will also require a blow torch so be sure that is something you are comfortable with before attempting this project.
Supplies for the Counterflow Wort Chiller:
- (1) 10 foot ¾ inch copper pipe
- (1) 10 foot ½ inch copper pipe
- (2) ¾ – ½ – ½ reducing tees
- (4) ½ to ½ NPT threaded fittings
- (2) ½ 90 degree elbows
- ~2 lbs of table salt
- 25 feet of 12 gauge copper wire
- Optional – wort pump
Directions:
- Start by laying the two copper pipes out next to each other. First fill each pipe with salt. This will prevent the pipes from collapsing and aid in making the bending of them easier.
- Next wrap the inside tube with copper wire to lower the clearance between the tube and shell and provide better heat transfer by pushing the water in a circular motion.
- Now take the reducing tee and mark both ends of the tube where the shell outlets will be. Keep at least an inch of the tube from the end of each tee. Also, you will need to use a metal file to file away the stop in the reducing tee.
- Strip the protective coat from roughly 25 feet for the 12 gauge copper wire.
- Next solderone end of the stripped wire to the tube where you made the outlet mark and begin to wrap it around the outer diameter of the tube. The wraps should be about one inch apart and tight.
- Next insert the tubing into the shell.
- Now pack the tube and shell with more salt. A funnel can help make this easier.
- Next you will need something like a 4.5 inch iron pipe to bend the copper tubing around. Affix the copper to the pipe, or other form, to start the bend.
- Now, heat will be necessary to bend the copper shell and tubing. Using a blow torch, slowly heat up the shell until it starts changing colors with the heat. Be sure to move the flame and don’t keep it in one place too long to avoid burning a hole in the copper.
- Once the pipe has changed colors, apply slight and constant pressure to the pipe and keep the flame moving forward. The goal here is to have enough heat to bend the pipe but not too much to form kinks.
- Keep moving around the copper tubing and shell around the pipe or form until you run out. Now let everything cool before adding the
- The interior tube should extend out past the exterior shell. To do this, you will most likely have to use a pipe cutter to remove some of the shell. After the cut portion of the shell is removed, it’s possible to clip the wire if it is in the way of the tee sliding onto the end of the shell.
- Finish one full end then use water pressure from a water hose to rinse out the salt before finishing the other end.
The Final Steps as Recommended by Homebrew Academy are this:

- Insert the tube into the reducer tee and allow the tee to fit over the shell
- Insert one of the small pipes into the open reducer openings.
- Put the 90 degree elbow on that pipe.
- Insert the other small pipe into the elbow.
- Place the ½ npt threaded endings onto both open ends.
- Solder all of the joints.
- Once all of the joints are soldered, you can attach your favorite connector and hook it up to a water hose.
- Finally, you will need to clean the counterflow coil. To do so, turn on the water and wait. The water should dissolve the salt and within a few minutes you should have water coming out from the other end. Now place the hose on the other inlet and clean out that side as well. Then attach the other end, repeating the steps above.
- The last thing to do is test the chiller. One way to do so is to circulate boiling water through the tube until it is equal to the groundwater temperature which is going through the shell. Check for any leaks and solder or tighten where necessary.
FAQs
Question: What Does a Wort Chiller Do in Homebrewing?
Answer: Wort chillers are important to homebrewing for the main reason of preparing the wort for the yeast. After bringing the wort to a boil, the wort temperature needs to drop down to 80 degrees or lower before the yeast can be introduced.
Question: What is the Difference Between an Immersion Wort Chiller and a Counterflow Wort Chiller?
Answer: As the name suggests, immersion wort chillers are coiled copper or other tubing that is put down into the wort and cools the wort as cold water runs through the coil.
Counterflow on the other hand is not put into the actual kettle. Instead a pump pushes the wort through one tube while cold water runs through another outside tube cooling the wort that way.
Question: How Much is it to Purchase a Wort Chiller?
Answer: Immersion wort chillers can cost anywhere from $50 to $150 new, while counterflow wort chillers tend to be a little more a little more expensive at $300 plus due to the pump that is required.
Question: How Much is it to Make a Wort Chiller at Home?
Answer: For most DIY wort chiller projects, the projected cost is $50 for both an immersion wort chiller or counterflow wort chiller and can take anywhere from one to several hours.
Question: Which Type of Wort Chiller is Lower Maintenance?
Answer: Many homebrewers prefer immersion wort chillers due to the low maintenance nature of them. They are much easier to clean with far less nooks and crannies for buildup and microbes to hang out.
Final Thoughts
DIY wort chillers are crucial to a successful brewing project. While there are many different styles, two of the most common are the immersion wort chiller and the counterflow wort chiller.
These can be purchased, or for less money, built at home. The supplies listed above are suggestions, talk to someone at your local hardware store or homebrew shop for more DIY counterflow wort chiller ideas on supplies you can use.